
Our club on Youtube
Nets
Raynet
Repeaters
Broadband-Hamnet
Training
Members only
Devon Shipping Live Map
Devon Air Traffic Live Map
Links
About us
Broadband Hamnet/Meshnet
Five Steps to Mesh networking
Introduction
Imagine that you and your amateur radio colleagues were able to build and share a private Internet between your QTHs. You build a backbone network of 2.4 GHz links to other QTHs that are within sight or via repeater. At home, you attach computers to a router at your network termination points and run services over this private internet between each other. To connect to more distant hams you create a private tunnel over the public internet and expand your network globally. What services would you use on this private internet?
- Web servers showing information about the network status, capacity, outages and users.
- Repositories of club information, circuit diagrams, local designs and inventories.
- Check-in systems for voice net joining/leaving.
- Local weather reports, forecasts, propagation charts, logs and any shared information from members.
- Voice-over-IP like Skype.
- More advanced connections using telephones and a digital exchange (run on one of the computers).
- Webcams monitoring equipment, access doors or landscape/weather views. This is live video streaming.
- Remote access to other computers allowing you to use computers elsewhere on the private internet.
This is Broadband-Hamnet. It is a private internet run by amateur radio clubs, with network links to similar networks run by other clubs both local and national, even international. It is also called meshnet because point-to-point links can be installed between any hams, either between themselves or using repeater sites.
How do you get started with this subject? This web page is a tutorial starting you on the learning curve. Technical lessons are not rewarding at this stage, so this focuses on you building a private home network.
Step 1: Discover your own home Wifi network
Log into your home router to see how it works and learn some basic terms to see what is happening in the router. Your Internet Service Provider usually gives you a card or plastic tab with the passwords. Ignore the section on the Wireless Network for the moment and look for a section called Router Access. This requires you to open a browser and go to a URL called http://192.168.1.254 or http://192.168.1.1. You need a username and password that are usually on the base of the router, or on the card. The username is usually admin and the password is a random sequence of letters and numbers. When you are able to see the information, look at the main sections on the configuration menu:
- The ADSL link to your broadband provider. This is the Wide Area Network (WAN)
- The Local Ethernet services presented as socket(s) on the rear of the router. This your Local Area Network (LAN)
- Wifi capability showing channel, type (B/G/N), SSID, pass phrase and more. This is your Wireless LAN.
- Status of all your home devices that are switched on. Did you know you had this many? Do you recognise them all?
- How to upgrade the firmware.
Back on your computer, select the "Wifi Connection" menu so that you can see all the Wifi Access Points in your neighbourhood. If there are many close neighbours you could see as many as ten separate Access Points.
Make notes about what you have discovered about the router and Wifi networks in a project book. Or, use the "Print Screen" function to take a copy of the information and save/print it.
Step 2: Build your own new private home Wifi network.
You will need:
- A Linksys WRT54G Wifi router - this list shows which version of the router you should buy (and which not to buy). Search on eBay and make sure the seller knows exactly which version they have. The font showing this version number is quite small and you may need a magnifying glass to read it.. This Linksys router will not be used in your final Broadband-Hamnet system. It will only be used as a learning tool, where you will create your own Access Point (AP).
- A Raspberry Pi 3 computer - you will also need an HDMI cable to a TV or monitor, a keyboard, a mouse and an Ethernet cable to connect to the Linksys router. Any other Linux computer can be used instead.
- A tablet or portable computer with Wifi - this will connect to your new Wifi Access Point to demonstrate a working meshnet system.
What you will do:
- Install a new operating system (firmware) on the Linksys router.
- Connect to this operating system with the Raspberry Pi and use a web browser to change administrative settings on the router.
- Create a new Wifi network to which you can connect computers. No security will be used, so as to keep it simple.
- Install a web server on the Raspberry Pi.
- Connect the tablet to the new Wifi network and view the web page you created.
How to do it:
This diagram shows how to connect the devices and the sequence of steps to follow:
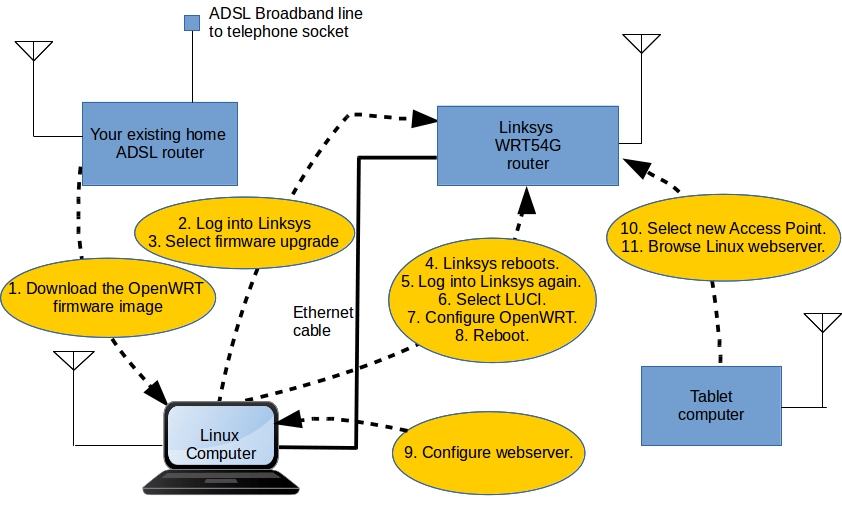
These instructions explain how to download a new firmware image called OpenWRT. It will first be downloaded onto your Linux computer and then transferred to the Linksys router, where it will be "flashed" into the router's memory. Rebooting the router then brings up OpenWRT as the router's operating system. By connecting an Ethernet cable between the Pi and the router, you will have a bring up a very different administrative interface to the one installed by Linksys.
By creating a new Access Point with a name of our choosing, such as your callsign, you have the beginnings of a new private Wifi network. To test this we will install a web server on the Linux computer. Using a second computer, such as a tablet or Wifi-enabled smartphone, we can select the new Access Point and then browse the new web server
- Assemble and power up the Linux computer, its monitor, mouse and keyboard. Attach an Ethernet cable to the Linksys router.
- Power up the Linksys router. You now need to reset the router to its factory default settings. This will bring it up with a known IP address, which we can connect to. On the rear panel, press and hold the recessed RESET button for 10 seconds. The front panel lamps will flash to show this has happened. Switch it off, wait 10 seconds and switch on again. If you are not familiar with this router, the User Guide may help you learn what the lamps and buttons are for.
- Open a browser on the Pi computer and enter a URL of http://192.168.1.1 This should connect to the Linksys router which shows a login screen. Enter the default user name of admin and password admin. You should now see the main configuration Setup screen. There is not much point spending time learning all the sub menus as we are going to install a new operating system, called OpenWRT, instead of this Linksys one.
- Download OpenWRT from the Broadband-Hamnet site as instructed here . When you reach the You're Done! line you have completed the installation of OpenWRT. On your Pi computer. go to the http://192.168.1.1 URL again and this time you will see the new firmware running on the Linksys. Click on LUCI. This is a smart windowing interface to the configuration of OpenWRT. Wait a few seconds for it to start up. You now have a new router and Wifi Access Point, doing just what the Linksys firmware used to do, but you have much more control over the many configuration settings.
- Configure the Wifi by renaming the SSID to your own callsign. As this may be the first of a few devices on your net, call it M0XYZ-100, substituting the M0XYZ for your own callsign. Save the configuration and reboot the router so that it boots up with its new SSID. That is all you need to do for the moment, but you can click on menus to see the scope of the many settings involved in network and router administration.
- On your Pi you need to install a web server. It is called the Apache2 web server This is done by clicking on the lower left button on the screen, selecting Administration, then Software Manager. It asks for your password and takes several seconds to start up. Go to the Search box in the top right of the application and type in Apache2. A list of results soon appears below. Double click on Apache2 and then click on the Install button. This takes several seconds to complete. Exit the Software Manager. You now have a web server running on your Pi.
- On your tablet, select the Wifi Settings menu and refresh the list. You should see a new SSID with your callsign as well as all the other ones you normally see. Connect to the one with your callsign.. Now go to your tablet's web browser and enter the http://192.168.1.1 URL. It should display the Apache2 Ubuntu Default page entitled "It Works". This web page is on the Pi and you have requested it to be displayed over a 2.4 GHz Wifi connection.
- If you imagine that 2.4 GHz Wifi connection is instead between two ham's mesh nodes via antennas on chimneys or high masts, then this is the first mesh link in the private internet. Using this we can remotely read information such as weather conditions or battery voltages at another site.
We have skipped many technical points. Now that you can see the various protocols and services in action, learning about them will make more sense.
When you have finished testing this, you will need to set the tablet back to use your usual Wifi settings for your home.
What next?
- Get to know the terms used in data networking. You need to what a mesh node is. So read this lengthy page a couple times to understand that it is not a computer, but a smart router.
- Learn to use Linux. You could use Windows, but very few hams do.
- Read the links on the references at the end of this page. This list was compiled from many internet resources that are structured here into a more useful list for UK amateurs.
Step 3 Design your home Wifi network
In Step 1 you saw how many Wifi-enabled devices you have about the home. More will appear as you add devices for your Broadband-Hamnet network. This means that your home Wifi Access Point is going to get busier and possibly congested with traffic from many services. As you saw, your devices are on a Local Area Network (LAN) and a Wireless LAN. It is possible to split these into smaller LANS using Virtual LANS (VLANs). This helps stop the busy services competing for all your internet capacity. For instance, demands of the video streaming (e.g. Googlecast) competing with a video-conferencing service (e.g. SKype).
This step is designed to let you plan a suitable VLAN design for your home. It is not necessary to implement this now, but it is useful to start planning how you use the internet around your home. You need particular services to only go to particular Wifi devices. Here is a typical configuration matching devices to suitable VLANs.
| Wifi Device | VLAN name | |||
|---|---|---|---|---|
| Home security | Home entertainment | Hamnet | Secure business | |
| Main computer | yes | yes | yes | yes |
| Family computers | no | yes | no | no |
| Surveillance webcams | yes | no | yes | no |
| Xbox game console | no | yes | no | no |
| Tablet computers | no | yes | no | no |
| Smart TV and recorder | no | yes | no | no |
| Amazon Firestick/GoogleCast | no | yes | no | no |
| Ham shack computers | no | no | yes | no |
| Smartphones | yes | yes | no | no |
| Printer | no | no | yes | yes |
| Smart kitchen appliances | no | yes | no | no |
This may seem over-complicated now, but it is typical of some homes in the UK already. If we confine data traffic to the correct VLAN we add security to the network too. Write your own table in the project book so that you can see how use is going to grow. If you think you are not going to add more devices, read more about the Internet of Things.
As you purchase smarter units to build your Broadband-Hamnet, this becomes important so that your domestic data is not visible to anything you may want to share on Meshnet to other hams. What data would this be? Perhaps a weather camera, Web-SDR, weather station, local repeater status, file store of club information. And in future this could be a software telephone exchange, videoconferencing service or voice-over-IP (VOIP).
Rob 2E0RPT has taken this to its next stage of complexity, showing how to configure a Netgear router for this purpose. Not every router has VLAN capability. Those that do support the IEEE 802.1Q standard.
Step 4 Get to know your Raspberry Pi and Linux
If you are already using the Raspberry Pi you can see that it can perform all the tasks that a Windows computer can do. The difference is mainly in the the names of applications and where files are stored. The Pi is limited primarily by an absence of hard disks for data storage. The SD card (or micro-SD card on the Pi 3) can store up to 64 GB depending on how much capacity purchased. If you are not going to store large amounts of data then the Pi can be used in many places in the home. As it is only £30 (plus the cost of PSU), it allows the easy deployment of computers for specific jobs in the shack.
If you don't have a Pi, you can re-use and old Windows computer as a Linux computer. Many websites document how to do this. They begin with you downloaded a Linux ISO image, which is a ZIP file containing the complete operating system compressed to a single huge file. Installation of Linux means unzipping this image and installing all the folders and files that make up the Linux operating system.
Learning how to use Linux beyond the windows front-end is very worthwhile because much administration is performed at the command line using an editor. This may seem like a return to MS-DOS but is really very efficient and allows you to work much faster. For instance you can list the files in a folder, look at all the processes running on your computer and check the date, with three short commands. No need to hunt for windows and buttons to click with your mouse!
This website starts you off with the subject and is written at a level you will understand easily.
Step 5 Decide on your choice of externally mounted Wifi router
This information is always changing but a good reference for UK hams is once again compiled by Rob 2E0RPT.
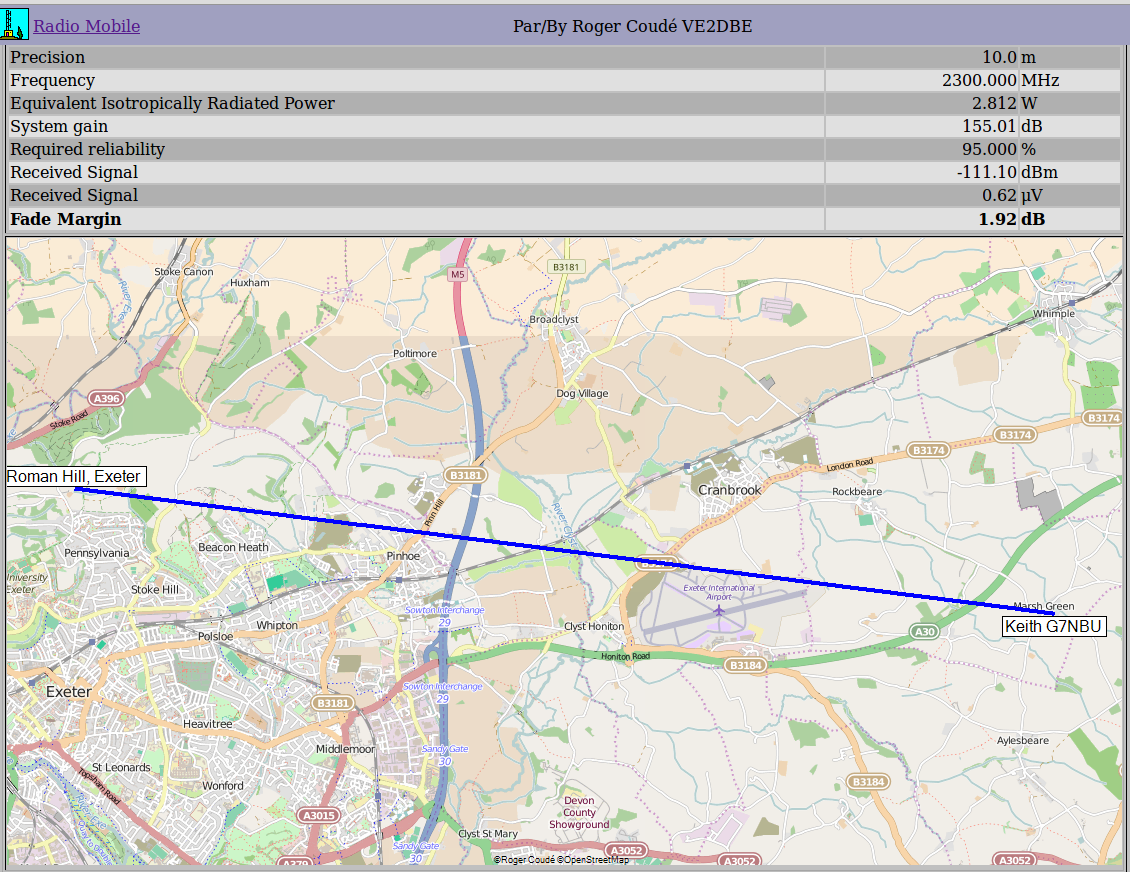
After enough club members are up to speed we will choose the best hardware and firmware to run on it. We need to do a path analysis of routes from our shacks to each other, if possible, or to the GB3EW repeater site. Here we will install either an omni-directional antenna or three or more sector antennas to cover the region.
A grid will be constructed showing the results of site surveys between all active sites. The Radio Mobile program from Roger VE2DBE will be used to do this as it has settings for 2.3 GHz path predictions. Here is a prediction for GB3EW to G7NBU's shack. Part A and Part B.
There are many manufacturers of devices for operating Wifi over large distances, with a simple Ethernet interface. These devices attach to a chimney or mast and open a path to a nearby repeater site or another club member. Linksys routers are not recommended. AE5CA makes the point that the Linksys routers may work, but by the time you have laid in a cable (for 2.4 GHz) and dish, it will cost £200. So Linksys routers are really just for building networks around the home to learn how mesh-networking operates and seeing the administrative software you have to use.
Ubiquiti devices attach directly on the chimney/side-of-house mast via an Ethernet cable carrying DC power running to it. TP-Link devices are even cheaper and have good reviews. Rob 2E0RPT has an excellent assessment of his experiences with these devices.
Firmware Images
There is a choice of firmware images to download to your Pi and your Wifi routers..
| Routers | Raspberry Pi computers | |||
|---|---|---|---|---|
| OpenWRT | dd-wrt | AREDN | FEEDNet | HSMM-Pi |
| Runs on a huge selection of routers. Used for this tutorial. | This is a professional product that is free for single use. | Specifically for US Emergency Comms users, so the best match for Raynet needs. | Excellent documentation and for UK hams. An email has to be sent to the owner to request a download site link. | It is a downloadable program to configure a Pi as a Gateway node or a Mesh node. Requires good networking knowledge. |
References
Getting started
Where everyone begins - The USA's Broadband-Hamnet website. Their First Starting Page looks very daunting. Don't be put off. These are the new phrases you will be learning to use them. You remember learning about mixers, oscillators, feeders, etc in the good old days? This is same learning curve, but in today's computer networking field.
How do we do it in the UK? The Forth Estuary Experimental Data Network shows what UK amateurs need to learn to become proficient. They even have created three skill levels (like Foundation, Intermediate and Advanced) to show what knowledge you need as you proceed.
You missed the UK's first Broadband - Hamnet Conference at Crawley Amateur Radio Club in the summer of 2016. These are the main presentation notes, very kindly supplied by the Chairman Ted G4ELM and Rob 2E0RPT. Unfortunately, no one volunteered to take this on and make it an annual event.
Ted is an active microwave operator and wrote Low-cost Microwave Operating - with a Learning Bonus which was published in Scatterpoint in July 2016. It is good to read as he uses a friendly informal style.
What does it look like? Have a look at Andy G7UHN's experiences building a node and running web services.
Want more ? Well look at 2E0DFU's experiences as he gets out in the field. Or the University of Bath installation of GB3UT.
Need some more explanation about the UK Hamnet experience. Rob 2E0RPT has documented all the equipment specific information for UK amateurs.
What is happening in Germany? Ruhrlink have a German language website, but the graphics speak volumes about how extensive their network is and what equipment is used.
Raynet
Can this be used for Raynet? It certainly can and is the reason we are developing skills. Feednet assess its use and point out that it should be tied into the public internet.
In the USA, emergency communications operators created the Amateur Radio Emergency Data Network. It split from the BBHN and has developed its own software for downloading onto suitable Wifi access points. This allows frequencies below the normal Wifi ones to be used, identified as Channel 0, Channel -1 and Channel -2. Their forum is one of the busiest BBHN news sources on the net.
A Youtube video showing a Treasure Hunt using Meshnet. Bring your own 4X4!
Using the Raspberry Pi as a mesh node
Installing a Raspberry Pi as either a gateway or mesh node. Try this downloadable program, but it is advanced users only.
Questions and answers: try the GooglePlus HSMM-Pi group.
Latest Amateur Radio News Headlines